先日の「CA.plで階層CAをつくる」に関連して、今回は複数段の階層CAを作成してみたいと思います。
先日の記事では、rootCAと中間CAの2つの認証局がありましたが、今回は中間CAを複数用意します。
図にすると以下のようになります。
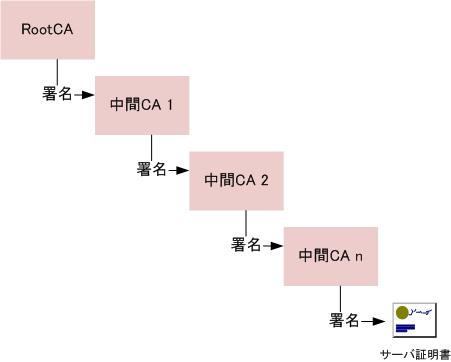
従来使われているサーバ証明書を見ると、RootCAから直接署名されているものはほとんどなく、約2~3個の中間CAがあるのがわかると思います。
今回はサーバ証明書がいくつの中間CAまで対応できるかを検証します。
先日の記事では、rootCAと中間CAの2つの認証局がありましたが、今回は中間CAを複数用意します。
図にすると以下のようになります。
従来使われているサーバ証明書を見ると、RootCAから直接署名されているものはほとんどなく、約2~3個の中間CAがあるのがわかると思います。
今回はサーバ証明書がいくつの中間CAまで対応できるかを検証します。
- RootCAの作成 まず、RootCAの証明書を作成します。
- rootca.key:RootCAの秘密鍵
- rootca.csr:RootCAのCSR(証明書要求)
- rootca.crt:RootCAの証明書
- 1段目の中間CAの作成 次に1段目の中間CAの作成をします。
- 2段目以降の中間CA証明書の作成 1段目の中間CA証明書と同じ手順を行えば2段目以降も作ることができます。
- dir:作成する中間CAの1段上の親CAのディレクトリ
- commonName_default:作成する中間CAのCommonName
今回は簡易的なものなのでopensslコマンドのみで作成することが可能です。
任意の場所にrootcaというディレクトリを作成し、ここにRootCA関連のファイルを保存します。
下記コマンドでRootCAの秘密鍵およびCSRを作成し、自分の秘密鍵で署名し自己署名証明書を作成します。
$ mkdir rootca
$ cd rootca
$ openssl req -new -keyout rootca.key -out rootca.csr
Generating a 1024 bit RSA private key
....++++++
..........++++++
writing new private key to 'rootca.key'
Enter PEM pass phrase:作成する秘密鍵のパスワードを入力
Verifying - Enter PEM pass phrase:作成する秘密鍵のパスワードを入力(確認)
-----
You are about to be asked to enter information that will be incorporated
into your certificate request.
What you are about to enter is what is called a Distinguished Name or a DN.
There are quite a few fields but you can leave some blank
For some fields there will be a default value,
If you enter '.', the field will be left blank.
-----
Country Name (2 letter code) [GB]:JP
State or Province Name (full name) [Berkshire]:Tokyo
Locality Name (eg, city) [Newbury]:Shibuya
Organization Name (eg, company) [My Company Ltd]:HDE,Inc.
Organizational Unit Name (eg, section) []:<Enter>
Common Name (eg, your name or your server's hostname) []:Root CA
Email Address []:.

Please enter the following 'extra' attributes
to be sent with your certificate request
A challenge password []:<Enter>
An optional company name []:<Enter>
$ openssl x509 -req -signkey rootca.key -in rootca.csr -out rootca.crt
Signature ok
subject=/C=JP/ST=Tokyo/L=Shibuya/O=HDE,Inc./CN=Root CA
Getting Private key
Enter pass phrase for rootca.key:秘密鍵のパスワードを入力
$ ls
rootca.crt  rootca.csr  rootca.key
作成されたファイルはそれぞれ以下のようなものです。
簡易的に署名をする際は以下のコマンドで行うことができます。
openssl x509 -CA-CAkey -req -in -out <証明書> -CAcreateserial
中間CAの証明書として利用できるかできないかは下記コマンドで証明書の詳細を出力することで確認できます。
$ openssl x509 -text -in <証明書>
Certificate:
    Data:
        Version: 3 (0x2)
        Serial Number: 1074 (0x432)
        Signature Algorithm: sha1WithRSAEncryption
        Issuer: C=JP, ST=Tokyo, L=Shibuya, O=HDE,Inc., CN=ca1.capybara.prd.local.hde.co.jp/emailAddress=.
        Validity
            Not Before: Jul 29 02:19:41 2008 GMT
            Not After : Jul 29 02:19:41 2009 GMT
        Subject: C=JP, ST=Tokyo, O=HDE Inc., CN=capybara.prd.local.hde.co.jp/emailAddress=.
        Subject Public Key Info:
            Public Key Algorithm: rsaEncryption
            RSA Public Key: (1024 bit)
                Modulus (1024 bit):
                    00:aa:5b:f2:42:6a:0f:2f:76:7c:dd:21:01:87:6e:
                    af:0e:d9:92:be:0b:4c:49:e0:0f:91:cd:5a:47:e9:
                    e9:7c:37:8b:e5:2d:8b:57:ce:4f:77:68:31:8c:15:
                    a3:dc:52:e6:04:7e:cc:da:d1:ce:5a:4e:f4:53:bf:
                    60:bd:e0:c4:f0:15:5e:d6:b0:c3:28:a6:be:b2:e6:
                    8d:fd:1c:58:c2:8b:97:66:22:7f:0f:00:d2:c7:76:
                    88:63:42:f1:57:b6:c8:58:c6:3f:d7:c4:13:f8:86:
                    97:48:30:56:13:01:3c:30:c3:29:fa:21:c6:8c:ce:
                    a1:3f:3e:96:53:59:1d:43:d5
                Exponent: 65537 (0x10001)
        X509v3 extensions:
            X509v3 Subject Key Identifier:
                9E:FF:47:E1:B2:9B:A5:45:36:B9:46:46:8D:85:F0:4F:E8:21:5F:14
            X509v3 Basic Constraints:
                CA:TRUE←このフィールドが存在すれば中間CAの証明書として利用可
    Signature Algorithm: sha1WithRSAEncryption
....
設定ファイルのひな形は/etc/pki/tls/openssl.cnfなので、これを利用します。
今回は簡易的に作れれば良いので、下記のような設定をした上、必要なディレクトリを作成します。
openssl.cnf編集箇所
path = ../tmp
dir = ../rootca
database = $dir/index.txt
new_certs_dir = $dir/newcerts
certificate = $dir/rootca.crt
serial = $dir/serial
private_key = $dir/rootca.key
x509_extensions = v3_ca
#authorityKeyIdentifier=keyid:always,issuer:always(v3_caセクションのもの)
$ ls
rootca
$ mkdir conf tmp
$ cp /etc/pki/tls/openssl.cnf conf/
$ vi conf/openssl.cnf
<上記の編集箇所をもとに編集>
$ touch tmp/index.txt tmp/serial
$ mkdir tmp/newcerts
$ find .
./tmp/serial
./index.txt
./newcerts
./rootca
./rootca/rootca.key
./rootca/rootca.csr
./rootca/rootca.crt
./conf
./conf/openssl.cnf
$ mkdir ca1
$ cd ca1
$ openssl req -new -keyout ca.key -out ca.csr
Generating a 1024 bit RSA private key
.......++++++
........++++++
writing new private key to 'ca.key'
Enter PEM pass phrase:作成する秘密鍵のパスワードを入力
Verifying - Enter PEM pass phrase:作成する秘密鍵のパスワードを入力
-----
You are about to be asked to enter information that will be incorporated
into your certificate request.
What you are about to enter is what is called a Distinguished Name or a DN.
There are quite a few fields but you can leave some blank
For some fields there will be a default value,
If you enter '.', the field will be left blank.
-----
Country Name (2 letter code) [GB]:JP
State or Province Name (full name) [Berkshire]:Tokyo
Locality Name (eg, city) [Newbury]:Shibuya
Organization Name (eg, company) [My Company Ltd]:HDE, Inc.
Organizational Unit Name (eg, section) []:.
Common Name (eg, your name or your server's hostname) []:CA1
Email Address []:.

Please enter the following 'extra' attributes
to be sent with your certificate request
A challenge password []:<Enter>
An optional company name []:<Enter>
$ openssl ca -policy policy_anything -config ../conf/openssl.cnf -out ca.crt -infiles ca.csr
Using configuration from ../conf/openssl.cnf
Enter pass phrase for ../rootca/rootca.key:
Check that the request matches the signature
Signature ok
Certificate Details:
        Serial Number: 3 (0x3)
        Validity
            Not Before: Sep  2 05:26:47 2008 GMT
            Not After : Sep  2 05:26:47 2009 GMT
        Subject:
            countryName               = JP
            stateOrProvinceName       = Tokyo
            localityName              = Shibuya
            organizationName          = HDE, Inc.
            commonName                = CA1
        X509v3 extensions:
            X509v3 Subject Key Identifier:
                40:5F:E6:91:58:3E:D8:03:3A:6F:55:A6:0C:F2:A9:83:96:F3:2D:9B
            X509v3 Basic Constraints:
                CA:TRUE
Certificate is to be certified until Sep  2 05:26:47 2009 GMT (365 days)
Sign the certificate? [y/n]:y


1 out of 1 certificate requests certified, commit? [y/n]y
Write out database with 1 new entries
Data Base Updated
$ ls
ca.crt  ca.csr  ca.key
しかし、今回は2段目以降はスクリプトを用意し自動的に作成できるようにします。
スクリプトでは、各段数に対応したCA用のディレクトリを作成(ディレクトリ名:ca<段数>)しその中に秘密鍵、証明書を格納します。
今回作成する中間CA証明書は、段数ごとに下記のパラメーターが異なります。
また、serialなどの署名を行う際に必要なファイルは1か所にまとめられるようにopenssl.cnfを変更します。
下記がスクリプトのソースです。
#!/bin/sh

max=$1
i=2

while [ $i -le $max ]
do
  before=`expr $i - 1`
  mkdir ca$i
  cat rootca/openssl.cnf |sed -e "s/^commonName_default\s*=.*$/commonName_default\t= ca$i.test.hde.co.jp/"|sed -e "s/^dir\s*=.*$/dir\t= \.\/ca$before/" > new.cnf

  dir=ca$i
  echo "====== create key and CSR($dir)"
  openssl req -batch -new -config new.cnf -keyout $dir/ca.key -out $dir/ca.csr 2> /dev/null
  echo "====== disable key password($dir)"
  openssl rsa -passin pass:hogehoge -in $dir/ca.key -out $dir/ca.key 2> /dev/null
  echo "====== sign CA($dir)"
  openssl ca -batch -policy policy_anything -config new.cnf -out $dir/ca.crt -infiles $dir/ca.csr 2> /dev/null

  i=`expr $i + 1`
done

rm -rf new.cnf


Leave a comment